
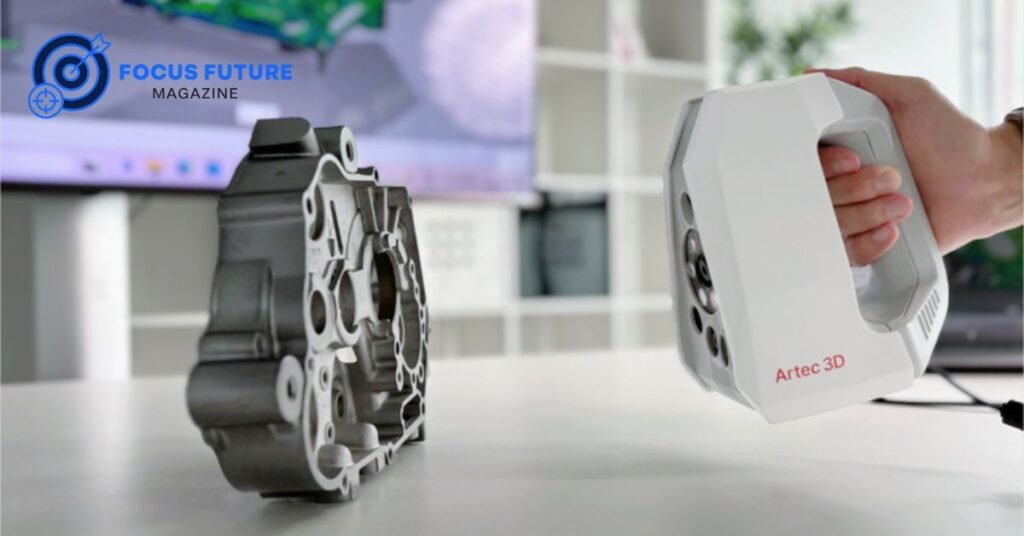
A 3D scanner and printer let you turn a real object into a digital file and then rebuild that file as a physical part. Together, they cover the full loop: capture, clean up, and fabricate. This guide walks through how the two devices work together, which technologies matter, and how to pick the right setup for your project — whether that’s a broken bracket, a cosplay prop, or a reverse-engineered mechanical part.
Most people searching for a 3D scanner and printer are comparing options rather than looking for one specific brand. Some want a bundle. Others want to know if a single scanner can pair with any printer they already own. This article answers both questions and everything in between.
What Is a 3D Scanner and Printer?
A 3D scanner and printer is really two separate tools that share a workflow rather than one machine. The scanner captures the shape, size, and sometimes the color of a physical object. The printer then takes a digital file and builds a matching object layer by layer.
Some products are marketed as an all-in-one 3D scanner and printer, but most of these are actually a printer bundled with a separate scanning device or app. True physical integration — where scanning and printing happen inside the same enclosure — is still uncommon. Knowing this distinction early saves buyers from assuming a “combo” box does more than it does.
How Scanning and Printing Work Together
What does a scanner capture? A scanner records thousands of surface points, known as a point cloud, and then stitches them into a triangulated mesh. This mesh describes shape and, depending on the scanner, color and texture too.
Can a scanner create a printable model? Not immediately. Raw scan data almost always needs cleanup — filling holes, removing noise, and fixing scale — before a slicer can accept it. A 3D scanner and printer workflow succeeds or fails based on how well this middle step is handled, not just on hardware specs.
3D Scanner Technologies
Different capture methods suit different objects, which matters when pairing a 3D scanner and printer for a specific project.
- Structured-light scanners project a pattern of light onto an object and read the distortion. They’re fast and detailed but struggle with shiny or transparent surfaces.
- Laser scanners use triangulation and work well for engineering parts, though they can require markers for larger surfaces.
- Infrared scanners are common for scanning people and general-purpose objects, with accuracy that varies by model.
- Photogrammetry builds a model from ordinary photographs. It’s affordable and scales well to large objects or environments, but result quality depends heavily on lighting and photo overlap.
3D Printer Technologies
The printer side of this setup determines what the final part looks and feels like.
- FDM and FFF printers melt filament layer by layer. They’re the cheapest to run and best for durable, functional parts.
- Resin printers (SLA, MSLA, DLP) cure liquid photopolymer with light, producing much finer detail — ideal for miniatures and facial scans, but requiring more careful chemical handling.
- SLS and other professional printers use powder-based processes that need little to no support structure, which suits complex geometry from a detailed scan.
Which printer technology is best? It depends on the part. Choose FDM for strength, resin for fine detail, and SLS or metal powder-bed systems for complex production parts.
Scanner Accuracy and Resolution
Buyers often confuse these two terms when shopping for a 3D scanner and printer combination.
Accuracy versus resolution: Accuracy measures how close a scan is to the object’s real dimensions. Resolution measures the smallest detail the scanner can capture. A high-resolution scanner can still produce an inaccurate model if calibration or tracking is poor.
Scan volume and working distance determine how large an object can be captured in one pass and from what range. Calibration and repeatability affect whether repeated scans of the same object come out consistent.
How accurate does a scanner need to be? For visual props or decorative prints, moderate accuracy is fine. For replacement parts or engineering work, look for scanners advertising 0.02–0.1 mm accuracy, and always test on your actual object type before relying on the numbers.
Scan-to-Print Workflow
A reliable 3D scanner and printer workflow follows a consistent sequence:
- Capture the object from multiple angles.
- Align the individual scan passes.
- Clean the mesh and remove noise.
- Repair holes in the geometry.
- Verify and correct the scale.
- Export the model to a printable format.
- Slice the file and print.
- Validate the finished part against the original.
It also helps to keep several versions of the same file as you move through this sequence: the raw point cloud, a cleaned mesh, a printable mesh, and, if needed, a reconstructed CAD model. Keeping the raw data untouched means you can always start over if a cleanup step goes wrong, rather than reworking the entire capture. Many beginners skip this habit and end up rescanning objects that could have been salvaged from an earlier stage of the same file.
File Formats
Choosing the right file format is central to any 3D scanner and printer pipeline.
| Format | Main Use | Color/Texture | Editable CAD? |
|---|---|---|---|
| STL | Direct 3D printing | No | No |
| OBJ | Mesh plus texture | Often | No |
| PLY | Point clouds, colored meshes | Often | No |
| 3MF | Modern print packaging | Can support | No |
| STEP | Parametric CAD exchange | No | Yes |
| IGES | CAD surface/curve exchange | No | Depends |
When is scan-to-CAD necessary? If you need to edit exact dimensions, holes, or fits, a mesh alone won’t do. You’ll need dedicated scan-to-CAD software or a manual reconstruction to get a true parametric STEP or IGES file.
This step is often the part buyers underestimate most. Reconstructing a mesh into clean, editable surfaces or solids can take longer than the original scan, especially for parts with curved surfaces, internal features, or tight tolerances. Some scan-to-CAD tools can automate simple shapes like cylinders and planes, but complex or organic geometry usually still needs a trained operator to get a usable result.
Choosing the Right Setup
The ideal 3D scanner and printer pairing changes depending on the project:
- Beginners do well with an affordable structured-light scanner and an easy FDM printer.
- Replacement parts benefit from moderate accuracy and an FDM printer using a durable material like PETG or nylon.
- Miniatures favor a fine-detail scanner paired with a resin printer.
- Cosplay props work well with photogrammetry or infrared scanning and larger-format FDM printing.
- Engineering projects need laser or blue-light scanning plus scan-to-CAD software.
- Large objects are best served by photogrammetry or LiDAR-style capture.
- Schools and makerspaces should prioritize ease of use, safety, and low maintenance over raw specs.
Separate Devices or Combo?
Most workflows still perform better with a separate scanner and printer rather than a single integrated unit, since each device has different hardware and software priorities.
Are all-in-one systems worth it? They can simplify storage and reduce clutter, but they often compromise on scanning accuracy, printer build volume, or both. Always check whether “scanning” in a combo product is physically built in or just a bundled accessory.
When should you buy separate devices? Choose separate hardware whenever you need to upgrade one side of the pipeline — a better scanner for detail work, or a bigger printer for large prints — without replacing everything at once.
Separate devices also give you more freedom over software. A dedicated scanner usually pairs with a full mesh-editing suite, while an integrated combo may lock you into whatever app the manufacturer ships. If you expect to outgrow your first purchase, buying the scanner and printer independently makes it easier to swap out just one piece later.
Surface and Scanning Challenges
Certain surfaces make this combination of hardware harder to use well.
- Shiny objects scatter light and confuse optical scanners; a removable matte spray usually helps.
- Black objects absorb light and reduce detail capture; specific exposure modes can compensate.
- Transparent objects are difficult for most consumer scanners without a temporary coating.
- Textureless objects may need markers so the scanner can track position.
- People and flexible objects risk motion artifacts, so faster capture modes are preferred.
Why does a scanner lose tracking? Usually from moving too fast, poor lighting, or a lack of visual or geometric features on the surface being scanned.
Printer Materials
Material choice affects the final strength, finish, and cost of any part produced through this pipeline.
- PLA is easy to print but brittle under stress.
- PETG offers a good balance of strength and printability.
- ABS and ASA handle heat and outdoor exposure better.
- Nylon is tough and flexible, suited to functional parts.
- TPU is rubber-like and used for flexible components.
- Resin delivers the finest surface detail but needs careful post-processing.
Which material is best for replacement parts? PETG or nylon are common choices when durability matters more than surface finish.
Software Requirements
A complete scanning-and-printing setup relies on several software layers: scanning software to capture and align data, mesh-repair tools to clean the file, CAD software when parametric editing is required, and slicer software to prepare the final print. Check operating system compatibility and whether licenses are subscription-based before buying, since this affects long-term cost as much as the hardware itself.
Costs and Ownership
The sticker price of a 3D scanner and printer setup is only part of the real cost. Budget for software subscriptions, filament or resin, scanning spray, replacement nozzles or build plates, calibration tools, and occasional failed prints. For occasional or one-off projects, outsourcing to a scanning or printing service may cost less than buying and maintaining your own equipment.
Safety Considerations
FDM printing can release ultrafine particles and volatile compounds depending on the material and ventilation. Resin printing introduces liquid photopolymer exposure that requires gloves, eye protection, and proper disposal. Schools, libraries, and makerspaces running a 3D scanner and printer setup should follow recognized safety guidance, including engineering controls like local exhaust and filtration where appropriate.
Legal and Privacy Issues
Can you copy a commercial product? Not always. Branded designs, patented parts, and trademarked shapes can be legally protected even if you scanned them yourself.
What rights apply to scanned objects? Copyright, design patents, and trade secrets may all apply depending on the object, so commercial use of a scanned file deserves caution.
How should human scan data be protected? Facial or body scans should be stored securely, with clear consent from anyone scanned, especially before sharing or publishing the data.
If you’re scanning people regularly — for costume fittings, medical applications, or portrait work — it’s worth having a simple written policy covering how long files are kept, who can access them, and whether they’re ever uploaded to cloud-based scanning software. Some scanning apps process data remotely by default, which is worth checking before you scan anyone other than yourself.
Common Mistakes
- Buying a scanner based only on its advertised accuracy number.
- Confusing resolution with accuracy.
- Sending a raw, unclean scan straight to a slicer.
- Treating an STL file as if it were fully editable CAD.
- Choosing a printer before defining the part’s material and tolerance needs.
- Skipping a small test print before producing the final part.
Expert Buying Tips
Start with the tolerance your project actually needs, not the scanner’s marketing claim. Keep a raw, unedited copy of every scan before cleanup. Use a small test print to confirm scale and fit before committing to a full-size part. When accuracy truly matters, validate the print against the original with a calibrated measurement, not just a visual check.
Latest 2026 Market Updates
Buying guides in 2026 increasingly organize 3D scanner and printer recommendations by object size, surface type, and intended workflow rather than by a single headline spec. PCMag’s mid-2026 printer guide named the Bambu Lab P2S as its top overall pick, with category picks such as the Snapmaker U1 for multicolor printing and the Elegoo Mars 5 Ultra for budget resin work. Scanner guides are placing more weight on standalone operation, export format flexibility, and software licensing — especially for buyers who eventually need STEP files rather than STL.
Frequently Asked Questions
Can you scan an object and 3D print it? Yes. The scanner digitizes the object into a mesh, and after cleanup, a printer can fabricate a physical copy from that file.
Can any scanner work with any printer? Usually, yes, as long as the scanner exports a file format the printer’s slicer can read. Compatibility depends more on software and file formats than on brand matching.
Is an STL file editable? Not like a CAD model. STL describes surface geometry only, so major dimensional edits usually require rebuilding the part in CAD software.
Is resin better than FDM for scanned models? Resin generally captures finer detail, making it a strong choice for miniatures and facial scans, while FDM suits larger, more durable, functional parts.
Do shiny objects require scanning spray? Often, yes. A removable matte spray reduces reflections and helps many optical scanners capture accurate geometry on glossy or metallic surfaces.
Is a 3D scanner and printer worth buying? For hobbyists, small businesses, schools, and engineers who regularly need to digitize and reproduce physical objects, a 3D scanner and printer setup can pay for itself by replacing outsourced scanning or one-off prototyping costs.
Conclusion
A 3D scanner and printer setup gives you a complete path from physical object to digital file to finished part. Success depends less on any single spec and more on matching scanner technology, file format, and printer material to your actual project — and on treating scan cleanup as a real step, not an afterthought. Whether you’re replacing a broken part, building a prop, or reverse-engineering a component, choosing your 3D scanner and printer combination around your object size, required accuracy, and budget will serve you far better than chasing the highest marketing number.